Capturing
and Editing Your Audio Story
Using
CoolEdit 2000
Now that you've recorded your story, checked your computer's
capabilities and set up your computer to capture audio by installing
CoolEdit, its time to capture and edit your story.
Recording
To do this connect your tape recorder to your computer, and start
up CoolEdit.
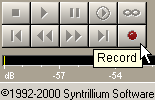 Once you are in CoolEdit, click on the Record button. There you will see a dialog box to select channels and frequency. ForRecording Time always use 16-bit, never use 8-bit or 32-bit audio format
(8-bit sounds very bad and 32-bit is generally unsupported). You want to capture the optimal sound quality during the recording phase and worry about compressing the sound later.
Once you are in CoolEdit, click on the Record button. There you will see a dialog box to select channels and frequency. ForRecording Time always use 16-bit, never use 8-bit or 32-bit audio format
(8-bit sounds very bad and 32-bit is generally unsupported). You want to capture the optimal sound quality during the recording phase and worry about compressing the sound later.
Frequencies above 44100Hz are not supported on all sound cards, so stick with 44100. If you have a stereo source (for music only,stereo for speech is completely unnecessary) you should select stereo, otherwise select mono".
Timed Record If you're recording off a recording device(such as a minidisk or audio cassette, etc) and you know the length of the material you wish to record, you can turn on Timed Record from the Options menu - this will allow you to let the recording go unattended,it will stop when however many minutes and seconds you specify have been recorded.
Recording is now in progress, and will continue until you either click the Stop button (or hit the Escape key) or until the specified time has elapsed if you have Timed Record enabled.
Peak Volume: Keep an eye on the volume meter (make sure "Show Levels on Play and Record" is checked under the Options menu) and make sure the level never goes above -1dB at any time. It's far better to keep the recording volume a little on the
low side (with peaks around -6dB) and amplify it later rather than record at too high a level because once the audio is clipped, it's pretty much impossible to make it sound good again.
Edit the recording
Unprocessed Recording
If you haven't worked with an audio-editing application such as CoolEdit before, left to right represents time, and up and down represents volume.
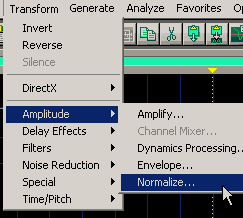
Options- Amplitude - Normalize
The first edit we will do is to "normalize" (amplify as much as possible without clipping). To do that, click on the Transform menu, then under the Amplitude submenu, click on Normalize....
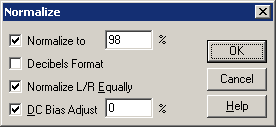
Normalize Dialog Set the options in the following dialog to match this screenshot (the Normalize Left/Right Equally option is disabled if you have a mono recording). Set to 98% rather than 100% to avoid possible clipping in the decoding phase of the final compressed file.
Normalized Recording
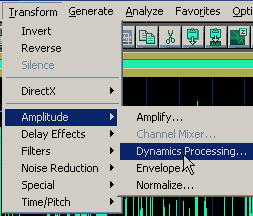
What you should see now is the loudest portions of your file reaching all the way to the top and/or bottom of the screen. The next step we will do will make the audio easier to listen to for Options - Amplitude - Dynamics Processing the average computer's speaker design, especially for speech.
Dynamics Processing Dialog
You can see that the loudest parts of the recording reach maximum volume, but most of the time the average volume is much closer to -5dB, -10dB, or even lower. To make speech easiest to understand, it's best to have the volume of all parts as close to the same as possible.
To do this, we'll make use of the Dynamics Processing feature in CoolEdit, which you will find under the Dynamics Processing Dialog. Click on Dynamics Processing..
Here you will have to create the profile yourself. There is no preset that exactly matches what we want to achieve here. First, make sure the Splines checkbox is checked, then drag the square from the upper-right corner of the grid down a little to -10dB.
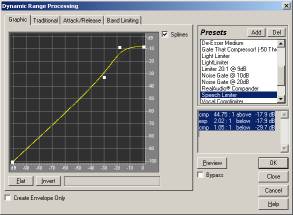
Then click in the grid where you see the other two white boxes in this picture, at approximately -20dB/-10dB and -30dB/-30dB. Alternately, it might be easier to enter numbers on the Traditional tab of the dialog. Select Compress 50:1 Above -20dB, Expand 2:1 Below -20dB, and Flat Below -30dB.
Make sure you enter negative numbers for those dB thresholds. Enter 10 for Output Compensation. Click back over to the Dynamics Processing - processed Graphic tab to make sure the graph still looks like the shape you see illustrated here - if you mis-entered some numbers the shape will be quite different and you should double-check your numbers. After you click OK and the processing is complete, the file should look something like this, with almost all the volume at about the same level, but not at maximum volume. Perform the same steps as we did early to normalize the volume to 98% again: click on the Transform menu, then under the Amplitude submenu, click on Normalize... The settings in the Normalize Dialog should not have changed since last time, but just for reference they should be set to 98% and DC Bias Adjust checked
and set to 0.
Delete Silence Menu
The next thing to do is to remove unneccesary gaps of silence. All speakers will leave pauses of varying length between sentences and ideas, etc.
Removing unneeded silence from within a recording will reduce the size of the file you create, resulting in faster downloads for your listeners and marginally lower server costs for you.
To delete silence from your recording, select Delete Silence... from the Edit menu. In the dialog Delete Silence - after that appears, set the numbers as illustrated, which differ somewhat from the default CoolEdit 2000 settings: Define "Silence"
as below -38dB for more than 1500 milliseconds, define "Audio" as above -34dB for more than 100 milliseconds, and Limit Continuous Silence to 1000 milliseconds. Once you have entered those numbers, click the "Scan for Silence Now" button, and CoolEdit will scan through your file and pick out any sections that have more than 1.5 seconds of continuous silence and delete all the silence after the first 1.0 seconds. You will usually find between 1 and 3 minutes of silence to delete in a 30-minute speech recording.
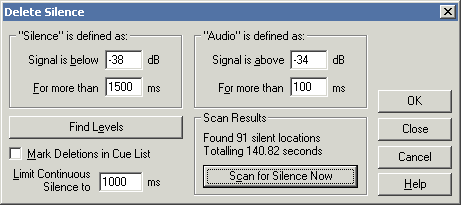
Click OK and the silence will be removed from your recording.
Zoom To Selection
The final editing is trimming the start and end of the recording to make sure that the recording begins and ends where you want it to. Highlight a small portion of the beginning of the recording with your mouse, then click the Zoom To Selection
button near the bottom-centre of the window.
Once you're zoomed in, you can highlight the exact part that precedes where you want the recording to start (use the Zoom In and/or Zoom Out Zoom Out Full buttons as neccesary to view as much of the recording as you need to). Once the part you don't
want is highlighted, hit the Delete key on your keyboard (or choose Delete Selection from the Edit menu).
Once you have trimmed the beginning, use the Zoom Out Full button to view the entire recording, and repeat the process to trim unwanted recording from the end.
Save Your File
You have now digitally edited your story. Save your recording in the standard uncompressed WAV format. Select Save As... from the File menu, type a filename, navigate to where you want to save the file, and select Windows PCM (*.wav) from the drop-down list of file formats. Click OK and your file will be saved.
If you need additional help with using CoolEdit, check out these links:
Quickstart Guide to CoolEdit
Cool Edit Pro Manual
Tutorials for Cool Edit:
http://support.syntrillium.com/howto/howto_001.html
http://support.syntrillium.com/howto/howto_003.html
CoolEdit
guide - North Carolina University
CoolEdit
Tutorial -Arizona University